Guide
Maru Booking — Setup Guide
Start accepting bookings in four simple steps.
Follow the screenshots from initial setup through advanced features.
Basic Setup
Basic setup
Load your store location
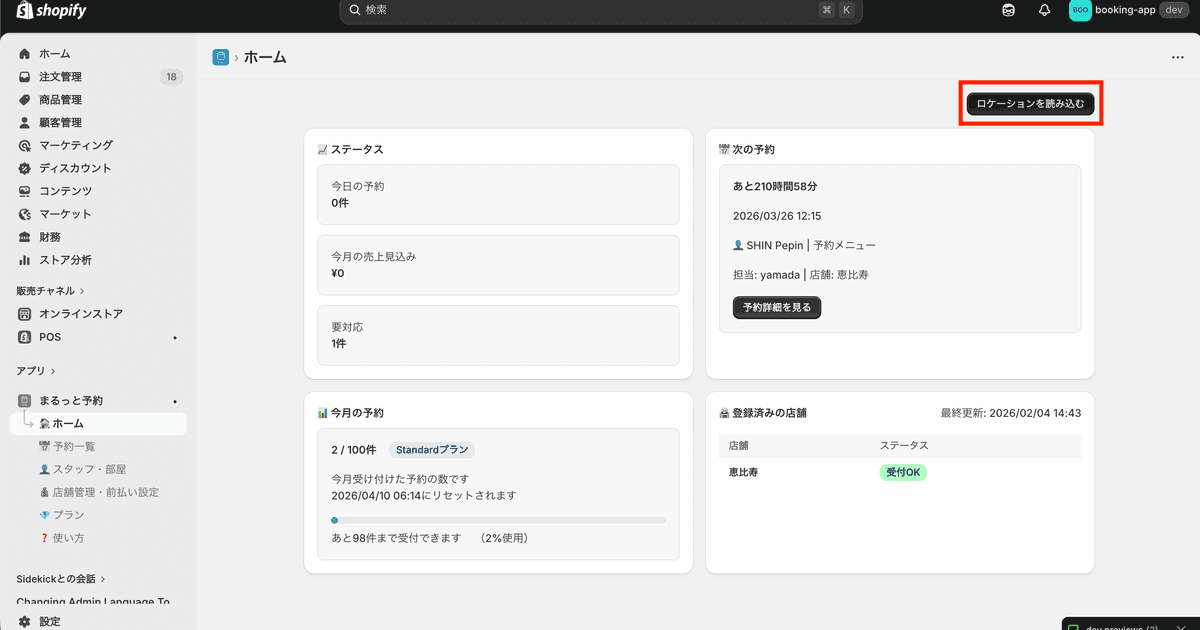
Import your existing Shopify store location into the app without entering it again.
- Click “Home” in the left menu.
- Click “Load locations” in the top-right corner, highlighted in red above.
- The import is complete when your store name appears.
Your store must already be listed under Settings → Locations in Shopify admin.
How to confirm
Setup is complete when the store name (location name) appears on the Home screen.
Add staff and rooms
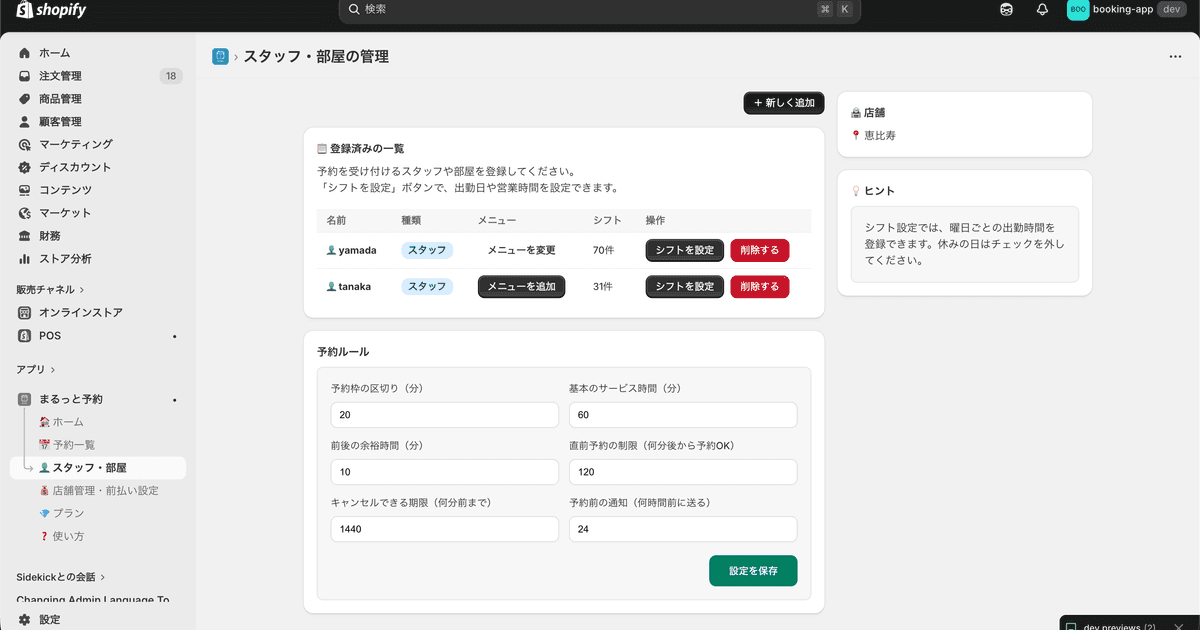
Add the staff, rooms, or spaces that customers can book.
- Click “Staff & rooms” in the left menu.
- Click “+ Add new.”
- Enter a name and choose a type: staff, room, or equipment.
- After adding the resource, use “Set schedule” to configure available dates and times.
⚠ Important
Availability will not appear in the booking calendar until a schedule is set. Always configure the schedule after adding a staff member.
💡 Use a customer-friendly name, such as “Alex,” “Meeting Room A,” or “Studio 1.”
💡 If one staff member works at several locations, switch locations and set a schedule for each one.
How to confirm
Setup is complete when the resource appears under “Staff & rooms” with its schedule configured.
Set booking menus and policies
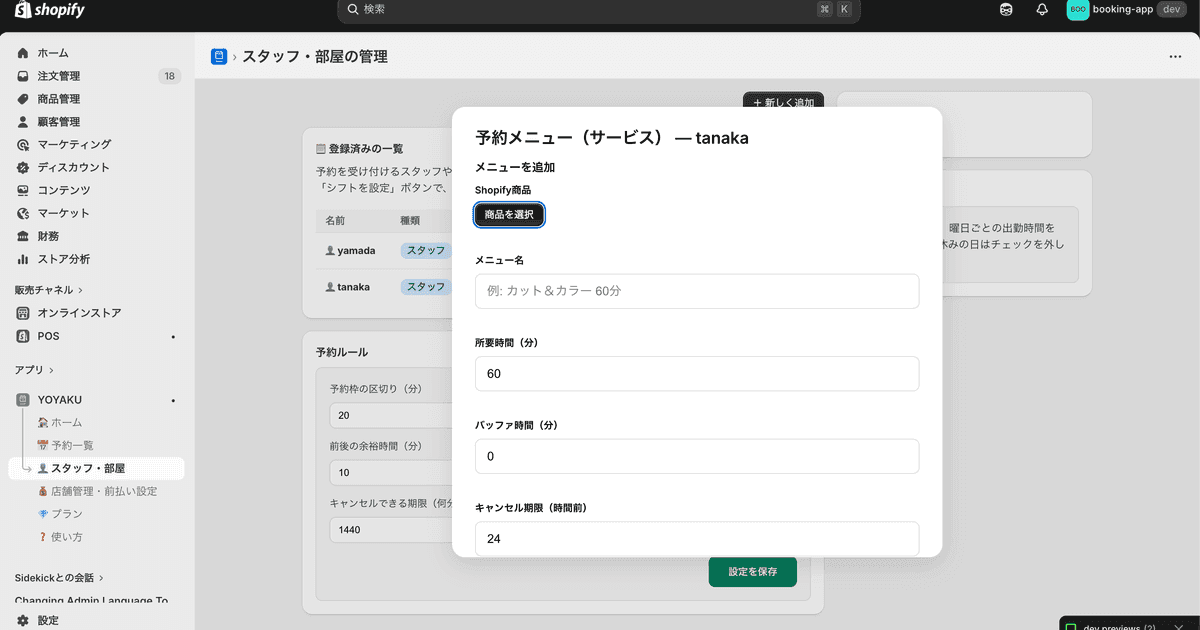
Configure the services each staff member offers and customize the booking rules.
⚠ Important
The booking calendar will not appear on a Shopify product page until its booking menu is assigned to a resource. Make sure the menu and resource are connected.
Booking menu
On each staff details screen, choose “Add menu” and connect a Shopify product. You can configure the menu name, duration, buffer time, and cancellation deadline separately.
Booking rules (shared settings)
- Time-slot interval: for example, every 15 or 30 minutes
- Buffer time: extra time between bookings
- Cancellation deadline: how far in advance customers can cancel
- Lead time: the minimum time before a customer can make a booking
📍 Location: “Staff & rooms” in the side menu
How to confirm
Setup is complete when the menu appears on the selected resource details screen under “Staff & rooms.”
Add the booking calendar to your store
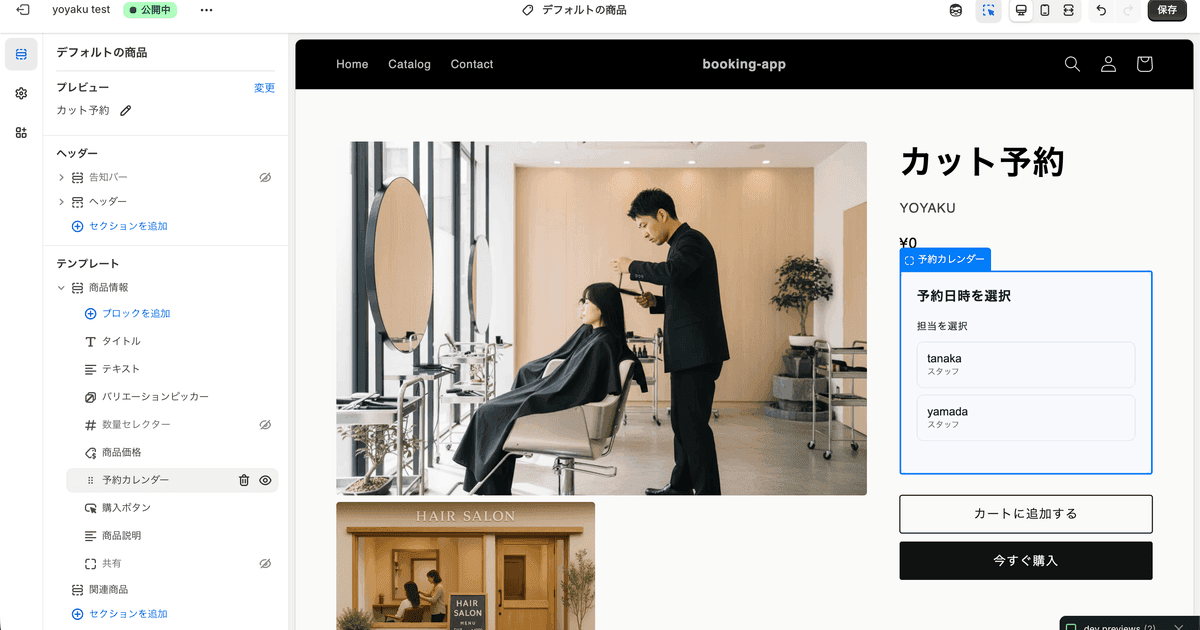
Add the booking calendar to a product page from the Shopify theme editor.
- In Shopify admin, open Online Store → Themes.
- Click “Customize.”
- Product page (product template)Open this template. The block cannot be installed on home or collection pages.
- Under “Add block,” choose “Booking Calendar.”
- Click “Save” to finish.
⚠ The calendar does not appear in the editor preview
The booking calendar is intentionally hidden in the theme editor preview. Save your changes, then use “View store” or open the publishedproduct pageto verify it.
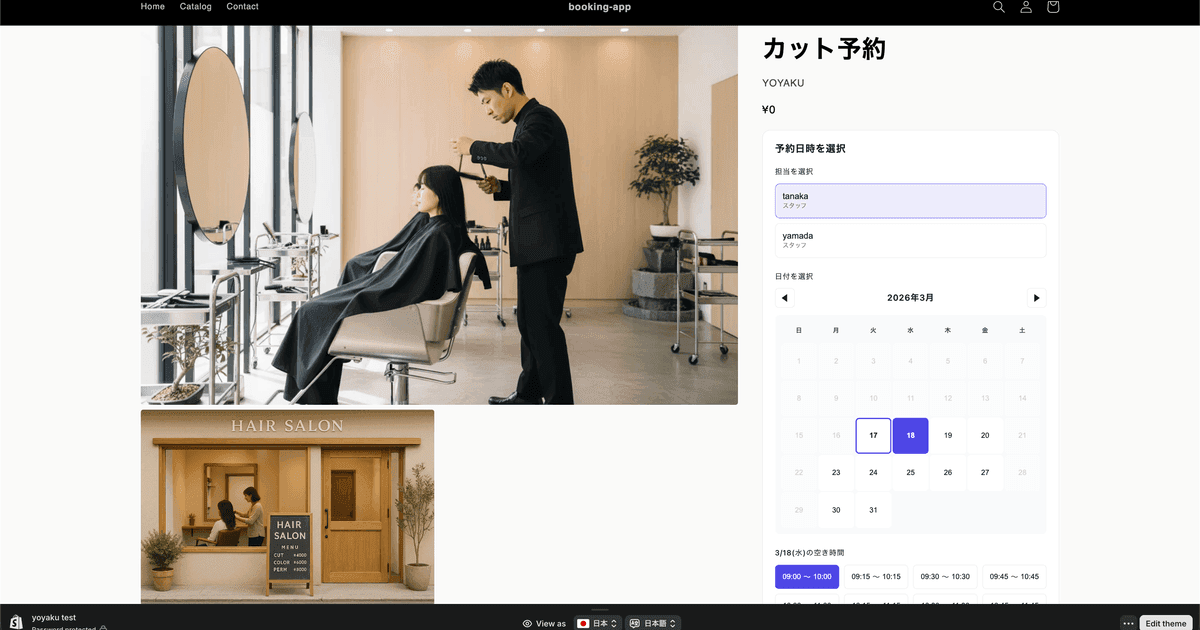
This is how the calendar appears after installation. Customers can choose a date, time, and staff member.
How to confirm
Setup is complete when the booking calendar appears on the storefront preview or live page.
Setup complete!
Your basic setup is now complete.
When a customer books through the calendar, the booking appears in the admin booking list in real time.
First, confirm the storefront display
- Click “View store” in the top-right corner of Shopify admin.
- Open theproduct pagewhere you want to accept bookings.
- Confirm that the booking calendar appears.
If it does not appear, open “If the calendar does not appear.”
Next, make a test booking
Make a test booking from the product page and confirm that it appears in the admin booking list. This lets you experience the full customer flow.
Next, explore the features that help you get more from Maru Booking.
Troubleshooting
When the booking calendar does not appear
If setup is complete but the calendar is missing from the product page, work through these common causesin order. Start with A and continue downward. Most cases are resolved by one of checks A through D.
The booking calendar is intentionally hidden in the theme editor preview. It is designed to run on the live storefront your customers visit.
- Click “Save” in the theme editor.
- Click “View store” in the top-right corner.
- On the live storefront, open theproduct pagewhere you want to accept bookings.
The most common point of confusion
A blank preview does not mean installation failed. The calendar can be hidden in the editor and still appear correctly on the live storefront.
The booking calendar checks whether the product has an assigned resource. Without that connection, the calendar remains hidden even when the theme block is installed.
- Open “Staff & rooms” in the side menu.
- Open the details screen for the staff member or room.
- Choose the Shopify product under “Add menu.”
- Set the duration and other options, then save.
The Booking Calendar block is registered by the theme app extension specifically for aproduct template. It cannot be added to the home page, collection pages, or standard pages.
How to check
In the theme editor page selector, choose a product page or product template before using “Add block.” The block does not appear as an option on other templates.
The booking calendar works through the product page Add to cart form (/cart/add). Without this form, the calendar cannot start.
⚠ Unsupported cases
- Themes heavily customized to remove or hide the cart button
- Products configured with cart functionality disabled
Shopify standard themes such as Dawn and Horizon work without extra changes. If you use a custom theme, confirm that the product page shows an Add to cart button.
If the calendar is still missing after checks A through D, use the browser developer tools for more detail.
- Open the product page where the booking calendar is missing.
- Right-click the page and choose “Inspect,” or press
F12on Windows orOption + Command + Ion Mac. - In the panel, check the Console tab for red errors and the Network tab for failed requests.
If you cannot isolate the issue, include the product page URL, theme name, and a developer-tools screenshot when emailing support@pepin.studio . We will investigate and reply as soon as possible.
Advanced
Advanced features
Customer portal — Let customers manage their bookings
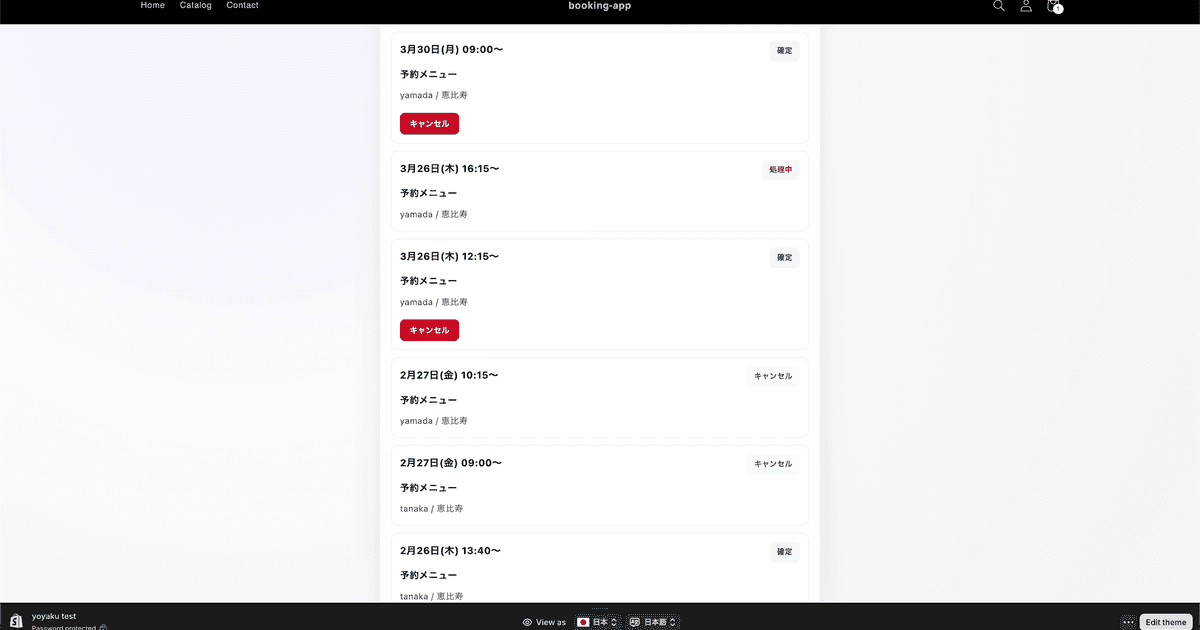
The customer portal gives customers a dedicated place to review and cancel their bookings.
What customers can do
- Review bookings with confirmed, processing, or canceled status
- Cancel a booking before the cancellation deadline
- Sign in with a Shopify customer account
Requirement
To use the customer portal, enable customer accounts under Settings → Customer accounts in Shopify admin.
Customer portal URL
https://your-store.myshopify.com/apps/booking/mypage
The portal becomes available automatically after a customer signs in, reducing booking-related support requests.
Frequently asked questions
Start using Maru Booking
Start with a 7-day free trial.
Install Maru Booking from the Shopify App Store.
Questions? Contact support@pepin.studio and we will be happy to help.